Zero Downtime Patching Overview:
ZDP relies on a highly available farm. That is, each SharePoint 2016 service must be running on a server while another server that runs that service is being patched. Thus, allowing the farm services to remain available to end users while the patches are installed on specific servers. ZDP also relies on a specific chronology of patch events. That high-level process consists of three phases and those phases and the activities of those phases are detailed below.
First, let’s visualize the ZDP process, using a Visio diagram of a typical SharePoint 2016 farm:
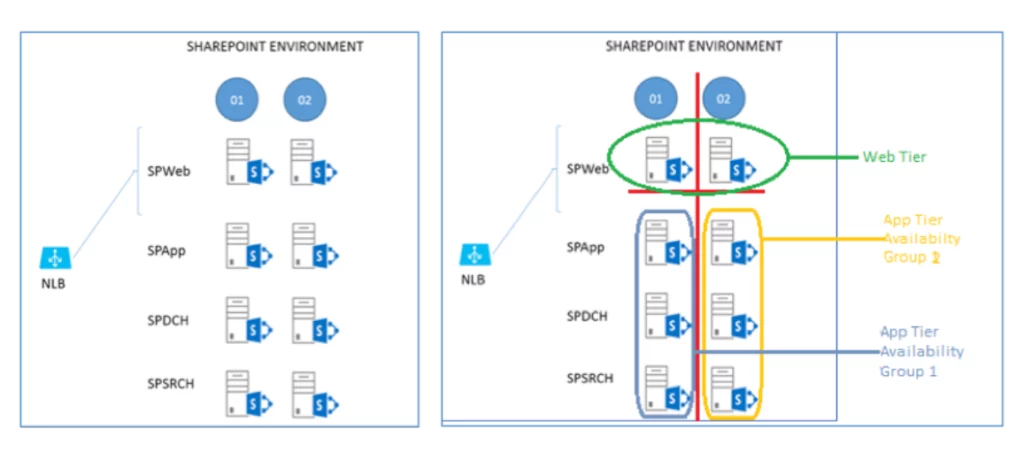
As depicted in the screenshot, we see a highly available farm, with redundant WFEs managed by a load balancer, App, Distributed Cache, and Search servers. In the second screenshot, we see how we’ve divided our farm conceptually into a Web Tier and an App Tier and into two Availability Groups. Our detailed instructions below will explain how we’ll patch servers by Tier and by Availability Group.
Phase 0 – Enable Side-by-Side
To enable side-by-side upgrade capabilities, run the following commands from an elevated SharePoint Management Shell:
$webapp = Get-SPWebApplication <webappURL>
$webapp.WebService.EnableSideBySide = $true
$webapp.WebService.update()
Phase 1 – Patch install
This phase consists of getting the patch binaries on the servers and installing them there.
1. Take the first WFE (SPWeb01) out of the load balancer and patch it with the ‘STS’ and ‘WSS’ packages. Reboot the server when patching is done. Return the server to rotation in the load balancer.
2. Take the second WFE (SPWeb02) out of the load balancer and patch it with the ‘STS’ and ‘WSS’ packages. Reboot the server when patching is done. Leave this server out of the load balancer until the entire upgrade is complete.
3. For each of SPApp, SPDCH, and SPSRCH in column 1, patch with ‘STS’ and ‘WSS’ packages. Reboot them when they’re done. (The work sent by SPWeb01 will fall on servers in column 2).
4. Now repeat the ‘patch and reboot’ for column 2. For each of SPApp02, SPDCH02, and SPSRCH02 in column 2, patch with ‘STS’ and ‘WSS’ packages. Reboot them when they’re done. (As you can see, work sent by SPWeb01 will now fall on servers in column 1.)
Install the update on each SharePoint 2016 server in the following order:

Phase 2 – PSConfig Upgrade
Every node in the SharePoint Server 2016 farm has the patches installed, and all have been rebooted. It’s time to do the build-to-build upgrade.
Content Database Upgrade discussion
During my research into ZDP, it became clear that Microsoft does not include upgrading a farm’s content databases as part of the ZDP time-consumption calculation. I say this because Microsoft’s ZDP instructions say the following:
Of course, any administrator concerned about Zero Downtime Patching probably has more than a handful of content databases that need upgrading during the patch event. So, there are several ways to handle upgrading content databases. Consider beginning the content database upgrade process before you run PSConfig: Once the update has been installed on farm servers, SharePoint becomes aware of it. So, administrators can run upgrade sessions in parallel. This approach diminishes the time it takes to upgrade the content databases. The following PowerShell commands can be run in batch mode in several SharePoint Management Shell windows, as detailed below:
Upgrade-SPContentDatabase WSS_Content_databasename1-Confirm:$false
Upgrade-SPContentDatabase WSS_Content_databasename2-Confirm:$false
For this reason, ZDP is somewhat mythical: most administrators will not configure READ-ONLY access during their content database upgrades.
And now, the PSConfig steps…
- Return to the WFE that is out of load-balanced rotation (SPWeb02), open the SharePoint 2016 Management Shell, and run this PSCONFIG command:
After the command completes, return this WFE (SPWeb02) to the load balancer. This server is fully patched and upgraded.
2. Remove SPWeb01 from the load balancer. Open the SharePoint 2016 Management Shell and run the same PSCONFIG command:
Return this WEF (SPWeb01) to the load balancer. It is also fully patched and upgraded now.
Both WFEs are patched and upgraded. Move on to the remainder of the farm but be sure that the required Microsoft PowerShell commands are run one server at a time and not in parallel. That means, for all of column 1, you’ll run the commands one server at a time. Then you’ll run them, one server at a time, for servers in column 2 with no overlapping. The end goal is preserving uptime. Running the PSCONFIG commands serially is the safest and most predictable means of completing the ZDP process, so that’s what we’ll do.
3. For all remaining servers in column 1 (SPApp01, SPDCH01, SPSRCH01), run the same PSCONFIG command in the SharePoint 2016 Management Shell. Do this on each server, one at a time, until all servers in column 1 are upgraded.
4. For all remaining servers in column 2 (SPApp02, SPDCH02, SPSRCH02), run the same PSCONFIG command in the SharePoint 2016 Management Shell. Do this on each server, one at a time, until all servers in column 1 are upgraded.
$webapp.WebService.SideBySideToken = <current build number in quotes, ex: “16.0.4338.1000”>$webapp.WebService.update()
Run PSConfig on each SharePoint 2016 server in the following order:

Why could MinRole help?
When you talk about ZDP you should also address the concept of MinRole. MinRole is an option in the installation of SharePoint Server 2016. It breaks the configuration of a farm into roles like Front End (WFE), Application Server (App), Distributed Cache (DCache), Search, or Custom (for custom code or third-party products). This configuration will give you four servers on average – two WFEs, two App servers, two DCache servers, and two Search servers.
By default, WFEs are tweaked for low latency and the App servers for high throughput. Likewise, bundling search components so that calls don’t have to leave the box on which they originate makes the Search servers work more efficiently. One of the biggest benefits of MinRole is that it builds in fault tolerance.
Why is High Availability required?
HA is a broad topic in SharePoint. There are entire whitepapers and articles about it online, such as this documentation via TechNet. To simplify the concept, at least for this article, realize that ZDP (and also MinRole) originated in SharePoint Online (SPO). In SPO, virtualized servers have redundancies built-in, so that two of the same role of server from the same SharePoint farm won’t live on the same host or rack. This makes SPO more fault-tolerant. You can model the same situation by having two of each SharePoint Server role on separate hosts on different racks in your own data center, with a shared router or cabling between racks to make for quicker communication. You can also simply have two physical servers for each SharePoint Server role set up in a test environment (choosing separate power bars for each half of your farm and making sure that routing between the set of servers is fast and, if possible, bypasses the wider network traffic for lower latency).
The goals here are high availability and fault tolerance. That means top priorities are separating the roles across racks or servers, making sure you have two of every role, facilitating quick network traffic between these two tiers, and making sure your setup has systems in place to monitor and automatically failover database servers. In terms of manually installing services in SharePoint (as when choosing the ‘Custom’ role), it is important that the services have redundancy inside the farm. For example, Distributed Cache is clustered, your farm has multiple WFEs, and you set up Application and Search servers in pairs. That way, in the event, that one server has a serious issue, the other can handle user load.
In the examples used here, I draw out physical servers to make concepts easier to grapple with. When it comes time to plan for ZDP, you should draw out your own environment, wherever it lives (complete with rack names/numbers, and server names where each SharePoint Server role can be found). This is one of the quickest ways to isolate any violations of the goals of role redundancy and fault tolerance that might have snuck into your setup, no matter the size your setup may be.
How does the SharePoint Server 2016 side-by-side functionality work?
If side-by-side functionality is enabled (and in previous patch levels of SharePoint 2016 even if it is not enabled) the final step of the SharePoint Configuration Wizard will copy all Javascript and CSS files which reside inside the …\\16\\TEMPLATE\\LAYOUTS directory into a directory that has the version number of the SharePoint component with the highest patch level on the system. (You might remember that different components on a SharePoint server can have different patch levels.)
Some of you might have noticed this directory and might have been curious about the purpose of this directory:
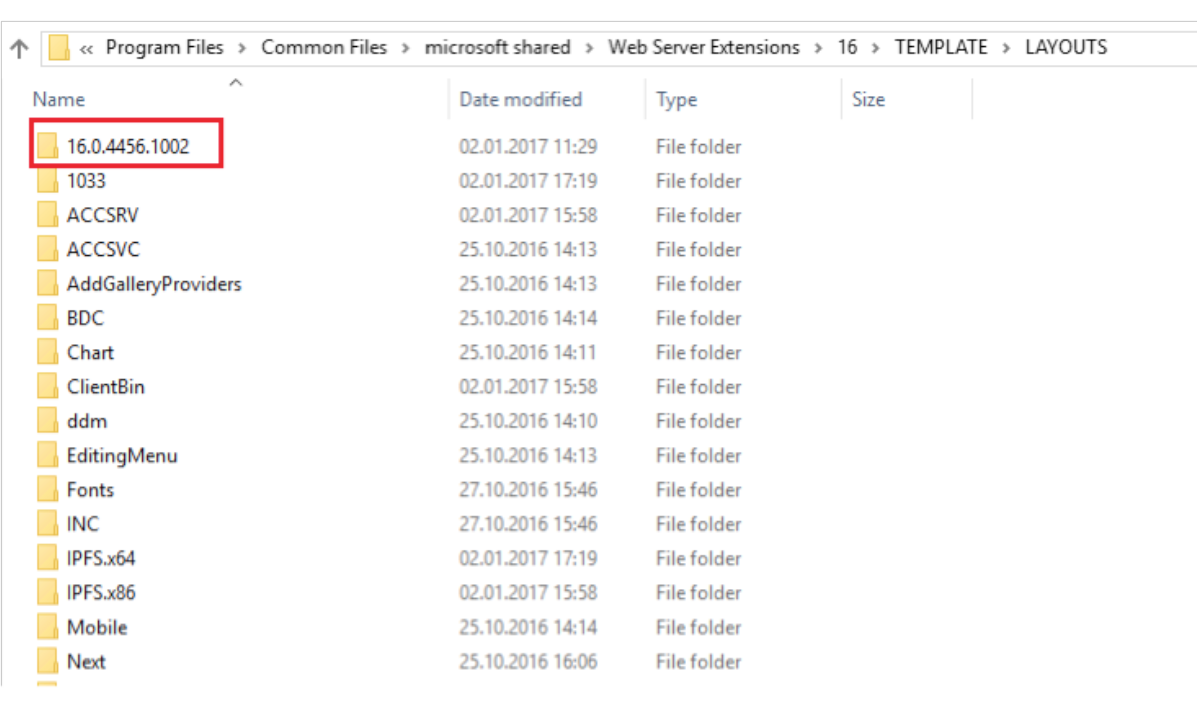
Inside this directory, you will find a copy of all the javascript and CSS files which are also in the layouts directory.
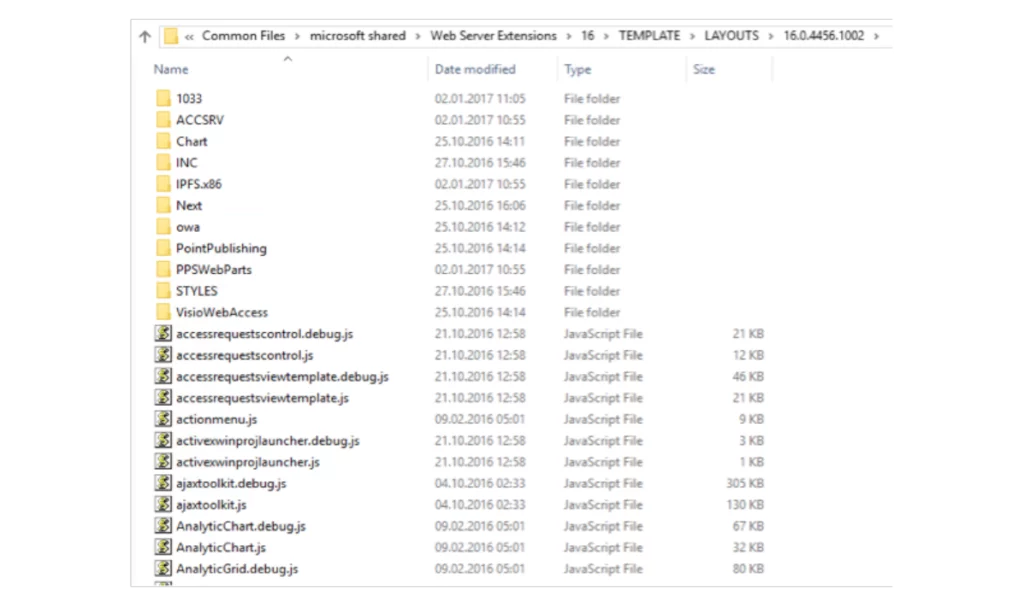
After enabling SharePoint Server 2016 side-by-side functionality SharePoint will generate URLs to the javascript inside this specific directory:

The benefit is clear: if SharePoint references a specific version of the JavaScript files with the version number included in the URL, then caching of old versions is no longer an issue. As soon as the SharePoint farm is configured to use the new version number the referenced URLs will be updated and the correct version of the JavaScript file will be downloaded.
After installing a new CU and running PSConfig you will notice a second version directory inside the LAYOUTS directory:
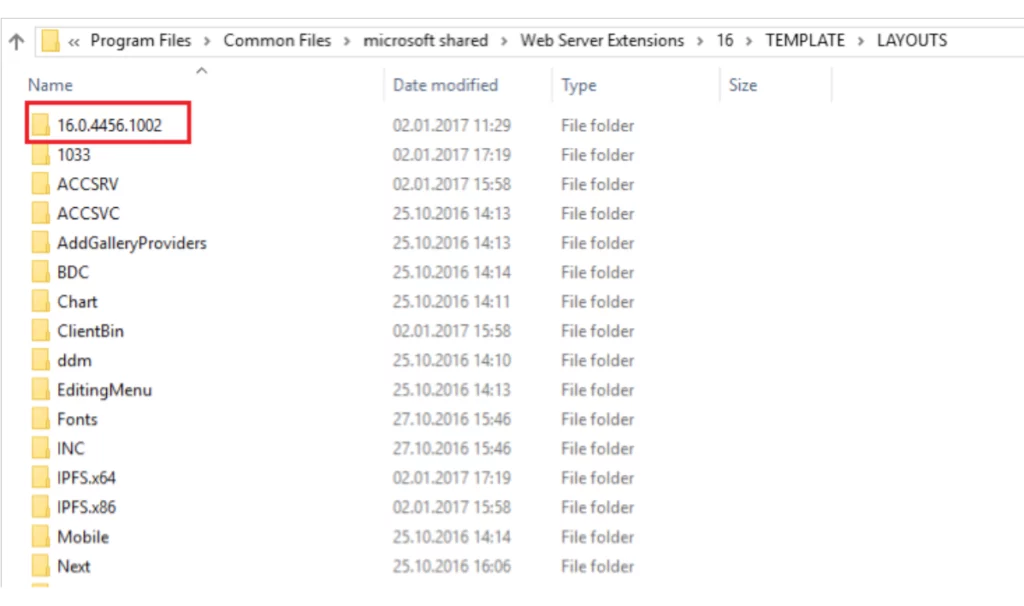
Be aware that the SharePoint configuration wizard will remove all side-by-side directories except the currently used one before creating a new side-by-side directory for the latest version. And the algorithm used here to remove the directories deletes all directories which slightly look like a side-by-side directory. And that means all directories which have the pattern of a version number. So, directory 1.2.3.4 would also be removed. Be careful not to use this pattern when creating custom directories inside the layouts directory!
So how does this help us with Zero-Downtime-Patching?
The side-by-side functionality does not automatically determine which javascript version to use. This is something a SharePoint administrator has to configure.
So the relevant steps related to Zero-downtime-patching would be as follows:
- Ensure that the side-by-side functionality has been enabled previously and that a version folder exists inside the LAYOUTS directory
- Configure the side-by-side functionality to use the specific version directory inside the layouts folder (in our example 16.0.4456.1002) by specifying the appropriate side-by-side token.
- Follow the normal instructions to perform zero-downtime-patching as outlined in the following articles:
– SharePoint Server 2016 Zero-Downtime Patching demystified
– SharePoint Server 2016 zero downtime patching steps - After all, servers are patched and the configuration wizard was executed on all machines configure the side-by-side functionality to use the new version directory inside the layouts folder (in our example 16.0.4471.1000) by specifying the appropriate side-by-side token.
These steps will guarantee that before and during patching the javascript files from the old directory (in our example 16.0.4456.1002) will be served. Only after the patching is complete and an administrator manually configures SharePoint to use the new version number (in our example 16.0.4471.1000) SharePoint will switch to the latest javascript files.
The result is that all servers on the farm always serve the same Javascript files independent of their specific patch level.
Ok, enough theory – how can I make use of the side-by-side functionality?
To enable the side-by-side functionality you need to set the EnableSideBySide property of the WebService to true (e.g.) by using PowerShell:

To ensure that a current side-by-side directory exists you can call the Copy-SPSideBySideFiles PowerShell command which will create the side-by-side directory for your current patch level:

If you would like to get a logfile about the performed copy operation you can specify the optional -LogFile parameter:

To ensure that the side-by-side files will be used in future HTTP requests to the server you finally have to configure the SideBySideToken. The value of this token has to match the name of the side-to-side directory that should be used:

That’s it! From now on links to the relevant javascript files in the layouts directory will point to the relevant file in the side-by-side directory of version 16.0.4456.1002.
After patching to a new CU (e.g. with build 16.0.4471.1000) and running PSConfig on all machines you only have to update the side-by-side token and all generated URLs will automatically be redirected to the new side-by-side directory:

